Do You Need To Buy Presets? Easy Tips for Editing and Taking Photos
This website uses affiliate links which may earn a commission at no additional cost to you. As an Amazon Associate I earn from qualifying purchases.
Updated: 28th November 2019
I can’t scroll through Instagram anymore without seeing an advert or post promoting preset packs, usually for Lightroom and often at a price that seems slightly expensive. In fact, people often message me asking for presets, but I always say the same: I have zero intention of ever selling them as they are so easy to make.
So, I guess the question is, do you really need to buy presets to make good travel photos – and when should you use them?

Editing and making your own presets in Lightroom
The first thing to admit is I rarely use presets, and the main reason for this is with my travel photography, I don’t want all my images to look the same and be processed in the same way. Oceans look different, colours need to be saved, and I believe the essence of a place can be told through the photos you take. The beauty of our world is everywhere is different, so I don’t think you should use the same filter on all places.
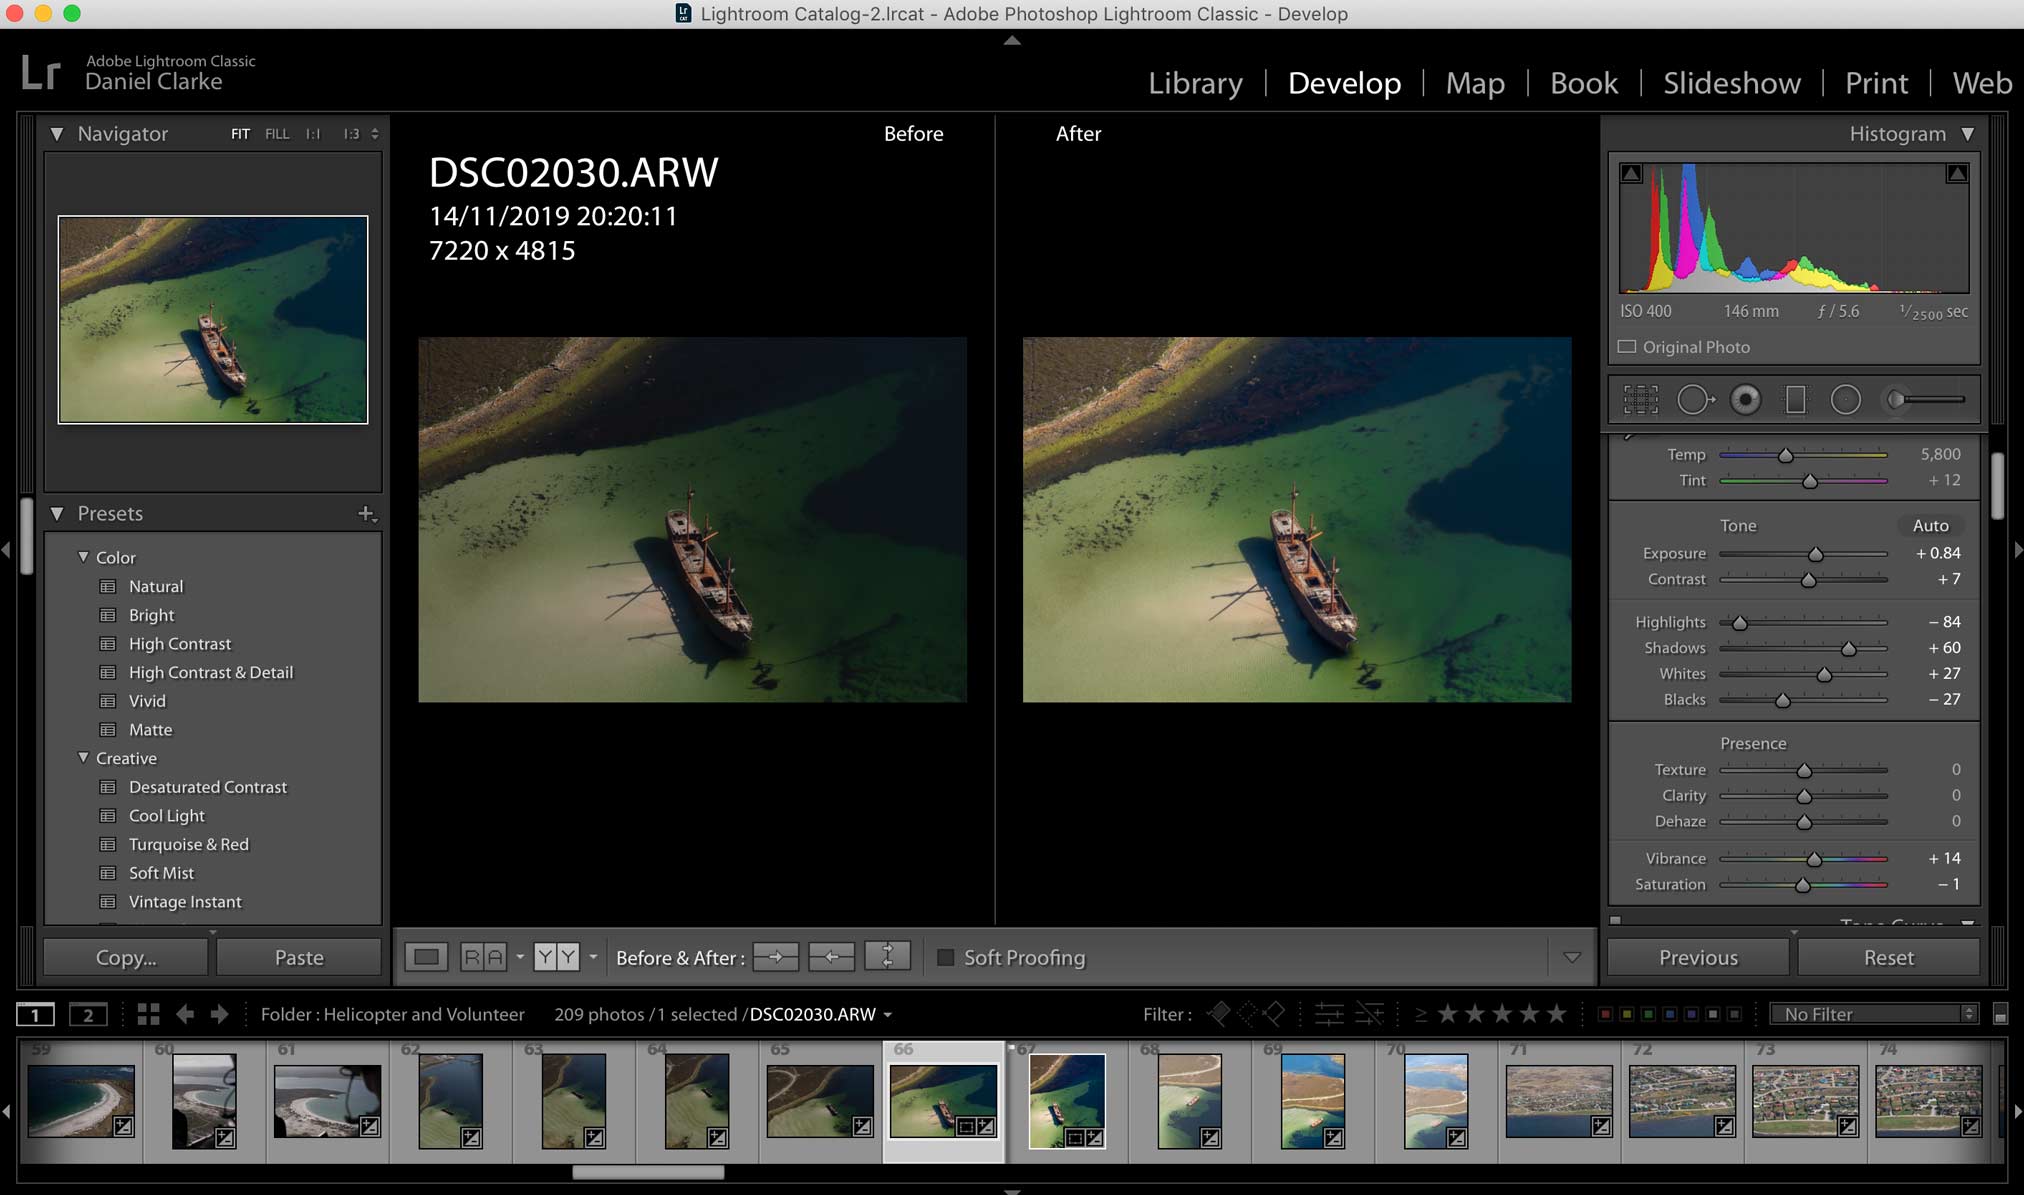
That said, I do sometimes create my own presets and use these on a block of photos. Say I have a series on the beaches of Sri Lanka, I’ll edit one image until I am happy with it, then save those edits as a preset which can be applied to the whole block of photos, then hopefully it will just be little tweaks to each one. Presets are there to save time, but if misused can actually make a picture worse.
You can also copy and paste photo settings in Lightroom too, so that’s an option if you are just editing a few photos and don’t want to create a preset.
The other bonus of using the right presets is you can apply these to all images when you import them, so some changes are already done when they arrive into your develop screen. My preset I run all images through corrects the meta-data, the camera profile lens-correction, while balance and applies some fundamental settings so I know when I come to editing, those first steps are already done.

To make your own preset is super simple in Lightroom, and can be done in a few steps:
1. Take a photo, and edit it using the panel on the right to look how you want it, such as lighting the shadows, auto-correcting white balance and perhaps increasing the vibrancy – essentially any edits that you want to action.
2. Click on the + button next to the Presets on the right hand save, and then select Create Preset. From here, you can save the preset under whatever name you want, and hey presto, it’s as simple as that – you have created your own preset. If you’re going to set this up to then action on all photos you import, this can be done on the right of the Import screen under Develop Settings.
Can Photoshop do presets too?
Yes indeed, Photoshop can do something similar to presets, but in this software, they are called Actions rather than Presets.
I personally rarely use photoshop for this, but you can essentially programme a group of actions which on a click of a button will be carried out to the image you select – to learn how to do this, check out this guide to photoshop actions.
Four simple tips for taking a better photo in camera
Of course, the main goal is to edit as little as possible, so taking the best version of the photo in-camera that you can really save time on the post-processing. In fact, at some publications such as National Geographic, they have very strict and tight rules on what, if any, editing can be done – likewise for news reporting and editorial, editing must be minimal to keep the imaging as close to the truth as possible.
1. Shoot in RAW. There are various different types of image file you can shoot in, and as a standard, most phones and consumer cameras output their image in JPG. Essentially, this means the camera has ‘done the editing’ for you – so you get a processed, smaller file size image at the end. By photographing in raw, a feature available not just on DSLRs anymore but various cameras, you save more of that data so that you can do the editing and processing, as the camera hasn’t done this for you. This ultimately gives you more control to edit afterwards.
2. Get the lighting right, and you’ll not need to do much editing – a lot of the edits I make are to highlights, shadow and the colour brightness, and if these are illuminated correctly you won’t need to make many edits at all. Before snapping the photo, look where the light is shining and then position yourself to suit this, or even consider returning at a different type of day. For portrait images of people, this can make a huge difference.
3. Go manual if you can, and I’m guilty of this too sometimes. It can seem easier just to put the camera in auto and go with it, and in some situations that will do the job nicely. But in others, such as if photographing out of a moving car or low-light, you’ll want to shoot in manual to get less noise or the camera to fire quickly. Learning a few bits of your camera will really help, and Aperture Priority mode, for example, can help you get the blur, while all other settings are in auto, meaning you don’t need to jump straight to manual.
4. Follow the rule of thirds by placing the critical parts of the image in the right place. Think of this as a 3-bar grid evenly placed, and then aligning the most substantial part of the image here — more of this on my easy photography tips article.

Apps and software for editing your travel photos
The other thing that catches me about this is how many people actually would have Lightroom, or indeed, need to pay the monthly fee for it. While most professional photographers I know have this Adobe package, for the average person that monthly payment might be a bit of a kicker so here are some other photo editing tool ideas to consider:
On Mobile:
1 Instasize – In the past few months, Instasize has really taken off, as they try to push into the creative community. It offers some basic photo editing, in the same way, Instagram does in-app, and also has a range of filters and presets, although many need to be paid for by using the premium version.
2 VSCO – A popular app has been around a long time, but personally, I find the import process a bit of a pain rather than just directly editing. That said, it comes packed with presets so if you prefer trialling different presets on the image and then doing your own editing, it is ideal for that.
3 Photoshop Express – On mobile, you’ll also find a free version of Photoshop, although the functions are more inline with photo editing like Lightroom than what Photoshop may be traditionally used for. If you are just looking for an upgrade from your in-camera editing software, however, this does the job.
4 Retouch – This handy little app is excellent for touching up photos and say removing people or things from your images, of course it won’t be as perfect as say Photoshop but can do the job while on the move to a good enough level for mobile photos.
On Desktop:
1 Luminar by Skylum (one-time fee) – By far the closest thing I’ve tried to Lightroom, and there is also a couple of other programmes that work alongside it. With most of the features of Lightroom, albeit in a slightly less intuitive way to me, this one-time payment software is my go-to recommendation for those who don’t want to get in the monthly billing cycle of Adobe. There are a few features on Luminar that I would personally avoid, but know would be popular with others, such as the AI sky replacer, and these little extras also mean you could likely just use this with no need for Photoshop either.
2 RawTherapee (free) – An opensource software, RawTherapee is pretty impressive as a free alternative, and as the title suggests, works well on raw images which allow for more editing power. I haven’t personally tried it, but the front-end looks like it’s packaged up with a lot of functions and features. There are plenty of other free alternatives out there which are also opensource.
So, while I’m not saying don’t buy presents, or don’t spend a tonne on software, for those who might be looking for a cheaper option or to develop their own editing skills, hopefully, the bite-size tips above will help. Safe travels and happy editing!
Read more: Best travel apps


Dan you are really amazing ,I’m A Solo traveller and I Love your tips , greetings from Morocco
Great tips, Dan! I always find that my travel photos contain elements I don’t want – other people, weird blurs, and the odd plastic bag. Thanks for these tips. I’ll use them.